CLICK HERE FOR FREE BLOGGER TEMPLATES, LINK BUTTONS AND MORE! »

Pages

Saturday, February 26, 2011

ABC DT V Day & Sweet Treats Challenge

ABC DT Challenge ends at midnight tonight...not sure of time zone so be sure to check! Here's the inspiration photo:
My sweet Tilda card for my granddaughters is a perfect fit. This Gingerbread Tilda works perfectly for Valentines Day too since she's carrying a basket full of hearts!
I made it using Gingerbread Tilda I won last year at http://groups.yahoo.com/group/magnoliacardandkitswaps/. The DP is from the Je T'adore collection by Making Memories. It was colored with Copic markers:
outfit - R00, 11, 17, 20, 22
hair - E50, 99, 29, YR21
basket - E50,29 YR21
boots - C1, 3, 5, N7

♥ ♥Check the link above on 3/3 for the winners!♥ ♥

Thursday, February 24, 2011

Kissing???????


Hmmm...just needed a break today to do something without Copic coloring or little human figures! I've spent hours coloring lately though there are no cards on the blog to show for it. They will appear someday :-)

I enjoyed this video at Hero Arts showing the "kissing" technique recently and thought I'd have a little fun trying something new and while I was at it, entered it in their February challenge.

Check out the stamps I used...
The inexpensive foam fleur de lis stamp was purchased years ago for a New Orleans album I made for my daughter who volunteered in St. Bernard Parish after Hurricane Katrina. It was the only stamp I could find in my stash that seemed appropriate for the technique so it basically dictated the direction of the card. So much for inspiration! Hey, but at least Paris is the city of "love"...right!?!

To achieve the "kissing" one must use 2 stamps which are pressed or kissed together to share ink from both stamps. I inked my fleur de lis stamp in black Memento and "kissed" it with the larger background stamp which was inked in white Brilliance ink. Lastly, the fleur de lis was stamped on gold matte metallic cardstock and voila'!

You can clearly see both images plus the added interest of the metallic finish to the cardstock. (Click image at right for a better look.)
I LOVE the look! I assembled the tag pocket from kraft cardstock, black brads reinforce the pocket edge which was folded down twice. I punched a hole at the back of the pocket and added a length of my brand new prize May Arts ribbon I won for my Valentine banner in an earlier post.
The ribbon was antiqued with black & walnut ink as was the kraft pocket. The double-layered image and pocket cardstock were distressed slightly as well. The fleur de lis was stamped twice so I could add some fun dimension. To finish things off I added 3 royal blue faux crystals which I colored with black Copic marker.

This technique was so much fun. I can't wait to try it again.

Tuesday, February 22, 2011

Stair Step Card

Today's adventure is to use some of the fun coloring I did this weekend. Since we have a number of weeks before Easter I thought I might get busy trying a new technique before the crunch hits so I decided to look around Split Coast Stampers for some ideas and came across wonderful Beate's stair step card and thought it would look terrific with my Tilda bunny. Watch for my card to show up on this post later today or tomorrow.

Saturday, February 19, 2011

Kraftin Kimmie Challenge #66

Check out the fun, original sketch for the current Kraftin Kimmie challenge. I might have to try this one if time permits!

Friday, February 18, 2011

MIA Valentine...


Thank goodness my little granddaughters got their Valentine from DH & I. This one I sent to my daughter's office at a large lawfirm downtown never arrived. She's our only unmarried child so I usually send one each year to her in thanks for all the running around she does for us. I can't believe it never arrived.

I proved you can make a great card without stamping! The double-layer heart was cut from Cricut's Doodlecharms cart. and embossed by the Cuttlebug. I antiqued it with a white foam stamp pad. The ribbons & lace are leftovers from the May Arts competition, entry below.

At least I thought to make photos!


UPDATE...the card showed up this week with 41 cents postage due! Interesting since I took it to the p.o. to be weighed. I can't see how this simple card could require $1.05 postage. I think I'll be making more rectangular cards!

Wednesday, February 16, 2011

May Art Ribbon Contest Winner


Wish I'd thought to tell my fellow bloggers before now but I hope you'll take a moment to stop by May Arts and give a shout out comment voting for my Valentine "LOVE" banner! It's a tight race and all your votes are so appreciated...thanks in advance!

UPDATE!!! My banner was a winner...not the grand prize but a winner. Thanks May Arts...I love your ribbon and fun challenges.

Monday, February 14, 2011

It's an Emerald Faery Valentine


I've waited patiently 'til today to announce "officially" that I have joined the design team (DT) at Deb's Creations in Queensland, Australia so I could share my very first project and L-O-V-E for this cool group and my new passion for the wonderful Emerald Faeries!


Check out the cool french fry style take out box I made from a LeeLou template in a double-sided DP. To make it a very cool present for my 4 year old granddaughter I added a scalloped 2 layer heart that I dry embossed with my Cuttlebug folder and antiqued lightly in white ink. The felt heart, flowers, ribbon, etc. are all from my special little V-day stash. I coated the cream pearl heart with pink Copics to make it work for the collage.

This weekend my special little gal came for an overnite with gramma & grandpop so we had a lot of fun making Valentine cookie pops to fill her box. The Wilton kit was a big hit and perfect project for an adult and 4 year old. I made the icing, filled bags, supervised and decorated a few myself but mostly it was fun spending time with my special little love!


My cute little faery is from the Larakin stamp from the Emerald Faery collection that is a shop exclusive to Deb's Creation. I am in the USA so I'm thrilled to beable to get digital downloads of the faeries so I don't have to wait for shipping. This means I can also manipulate them to my desire. I flip them and resize to suit whatever my need. This little fellow is the top faery (Ashtob, I believe.) in the sweet Larakin digi stamp. So to save ink and paper I just erased "Boo" from the bottom and printed away.

I love working with digi stamps but it takes a couple tries sometimes to get it right. I find it's best if I print my images out a day ahead so the ink dries well and I still give them a good once over with my Marvy embossing tool. You'll still need to avoid coloring over the lines so as to not smudge the ink. I used Copics on little Ashton as follows:
Skin - E0000, E50, E21, R00, R11, R20
Pants - G20, G42, YG00, E50
Hat - E50, RV23, RV25, RV29

I hope you'll stop on over to Deb's to order an Emerald Faery or her other cool stamps & supplies!

Friday, February 11, 2011

Valentine's Day LOVE Banner ! ! !


Happy V-Day, y'all!!! I made a couple of these thinking I'd send one to artiste extraordinaire, Leslie Avila (check her link in my list of favorite places on the left sidebar.) A few weeks back she posted on FB a "play it forward" challenge and I was lucky enough to be her 5th & final participant.


The wonderful ribbons I used on my "LOVE" banner were gifts from May Arts. I've entered this in their Valentine challenge too in addition to the matching card seen below with cute little Tilda.


For the banner I used labels & alphas diecuts from the Cricut Storybook cartridge and a folksy heart from another that I do not recall now. The accordian pleated bases for the letters were fanfolds using the MS scoring board. The tops have hand sewn borders of MS Eyelet lace. All parts were antiqued using walnut ink. The altered art end flags were decorated using lots of misc. items from my stash. Along with double-sided DP from K & Co. No dollars were used in the creation of this fun piece.....DH will be so happy!!

Thursday, February 10, 2011

Valentine Challenge Card

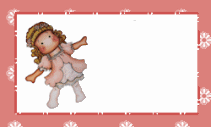
This fun sketch is by Melanie Navarro Fuentes from the Yahoo group Magnolia Card & Kit Swaps. This is a fun group stop by and check it out!

After a little struggle with ideas my card ended up turning out okay.
Thank goodness for a huge stash of ribbon and embellies! For some reason, I seem to have a problem with using flowers. Each time I set out to make a card, I always feel certain I will use flowers and true to form I did so this time but alas...NO flowers again! The ribbon & buttons looked so cute, I had to use them instead.There are 2 layers of pop-dots to give the card fun dimension. I used vintage K & Co. Valentine DP from my stash with one new addition from Making Memories. All layers were sewn with some extra distressing for fun.
For some added interest I dry embossed the pink heart Tilda is holding and added string. By the way, this Tilda is Butterfly Tilda who had a wing-ectomy! She's the only suitable Tilda I had for this card so I just took off her wings and added a paper-pieced dress and strung heart.
I love the card interior! Mine aren't usually this embellished :-) Again, I used the altered art style of tossing things out in a well-planned but not-looking-it fashion!!I colored Tilda with the following Copics:
Shoes - C1, 3, 5, N7
Socks - RV02, RV21, C1, RV000
Flesh - E50, E00, E0000, E21, R20, R00, R11
Hair - E50, E33, E21, E25
I'm entering this card in these challenges too:
All That Scraps Magnolia Challenge #6 - Queen of Hearts
7 Kids Kollege Fund #14- I {Heart} You
Magnolia Down Under - Love
Totally Tilda - Lots of Hearts

Thursday, February 3, 2011

Tilda Valentine...


Can you tell I'm loving this new Tilda stamp? It's so versatile...I just love it! So today's card is a Valentine destined for one of the precious little gals I love.


This was one of the first times testing out my Zutter Distrezz-It my kids gave me for Christmas. It sure beats those handheld numbers but takes some getting used to. I went hog-wild with the distressing using some packaging from Christmas packaging as a base on top of the kraft cardstock. Coupled with lots of yummy ribbon & cluny lace from May Arts, this was a fun Valentine card to create. The DP is by Making Memories from the the Je T'adore collection. The cute hugs coupon stamp is one of those $1 clearstamps from the craft store. I added tiny punched hearts and faux crystals for fun.
I'm currently on the road and don't have my Copics with me so I can't list them but can tell you the flesh is the same as below in "Mellow Yellow". Brunette hair - E000, E50, E33, E99. Pinafore - O, C1. Dress - R??? (will update soon.)
I'm entering this in the following challenges:
All That Scraps - Queen of Hearts (ends 2/13)
Totally Tilda's Challenge - #15 Lots of Hearts
Challenge #14 7 Kids Kollege Fund - I{heart}U
Simon Says - Love Is In The Air
May Arts for the Love of Ribbon Challenge